Rigged Characters
Importing rigged characters from Blender into Godot
Blender
Sample characters
Working .blend files of some of our default characters can be downloaded below:
Exporting process
Before exporting, characters should satisfy certain requirements in Blender:
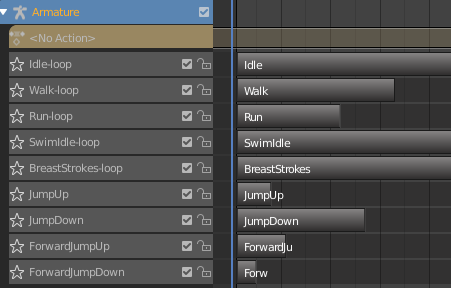
Include a single armature with the correct set of non-linear animations
This set should match the following:
Idle-loop
Walk-loop
Run-loop
SwimIdle-loop
BreastStrokes-loop
JumpUp
JumpDown
ForwardJumpUp
ForwardJumpDown
HoverboardIdle-loop
HoverboardForward-loop
Matching these names exactly is required for Godot to find the correct animations. The
-loopsuffix tells Godot to import those animations as looped animations and is required.
Have a minimal set of materials
Each additional material requires an additional draw call in-engine. Ideally a character only has a single material. If that is not possible due to customization etc., the number of materials should be kept as low as possible.
Only use a single mesh
Due to the way Godot handles mesh deformations/animations, having multiple separate meshes affected by the same animation will multiply the performance impact of that animation and can quickly result in massive FPS loss. Joining together all meshes into a single one will prevent this issue.
Joining meshes in Blender is a very easy process (
Select meshes->Ctrl+J) that will automatically preserve assigned materials/vertex-groups etc.An exception to this rule may be accessory/clothing/equipment meshes that are meant to be toggled on or off. These should however be kept at a minimum
Have a reasonable size
A character should be between 1.70m and 2.10m tall. Slight deviations are fine.
Use appropriately sized textures
Textures should never be larger than 2048x2048. That is a hard limit for mobile GPUs. We recommend much smaller textures to keep the file size small. 512x512 or smaller.
Ensure the exported model is no larger than 1-2MB. Character models are downloaded at runtime for each player, and thus need to be as efficient as possible.
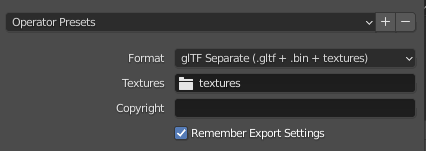
Once the character is ready, it should be exported using the .glTF Separate format via File -> Export -> glTF 2.0 (.glb/.gltf). Textures may be placed in a textures folder for consistency. This will export a .gltf file, a .bin file and the necessary textures.
Godot
Create a new assets/characters/CHARACTER_TYPE/CHARACTER_NAME/ directory and import the .gltf, .bin, and textures folder exported from Blender into that location.
The import settings of the .gltf file should be set to the following if not already set to them by default:
Materials -> Storage -> Files (.material)(This is important in order for Godot to actually reference the imported texture files)Animation -> Storage -> Built-In
Open the imported .gltf as a New Inherited scene, then save that scene as CHARACTER_NAME.tscn in the same directory.
This .tscn can now be selected as the character_mesh_path property of RealmCharacterBase.
Should the imported animation differ from the default Realm characters, you may need to adjust certain properties by attaching the scripts/realm_body/RealmCharacterProperties.gd script to the inherited .tscn scene, then adjusting those properties in the inspector. This is not required. The effects of the individual properties are described in the script file.
Last updated